
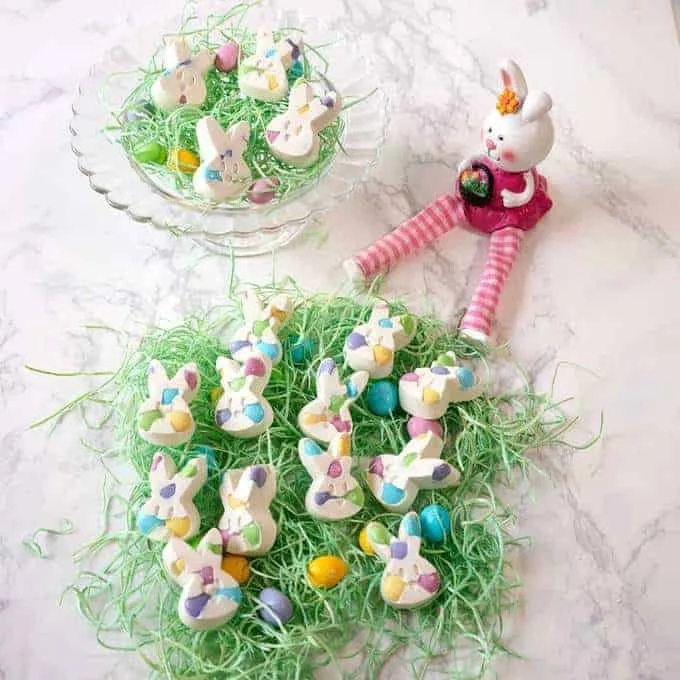
Easter Bunny Bark is a delightful treat that brings joy and festive cheer during the spring season. With its creamy white chocolate coating and vibrant pastel M&M’s, this recipe is not only visually appealing but also incredibly easy to make. It captures the essence of Easter with its fun bunny shapes and colorful candy pieces, making it a perfect activity for families. Whether you’re looking to impress your kids, share with friends, or simply indulge, this step-by-step guide will help you create this charming Easter delight in no time!
Ingredients
To bring your Easter Bunny Bark to life, you’ll need a few essential ingredients that combine to form a sweet and crunchy treat:
- Easter bunny silicone pan: This cute mold is key to shaping your bunny bark, giving it that festive touch.
- Disposable piping bag: With this handy tool, you can easily melt and pipe the candy melts without any mess.
- 120 pastel colored M&M’s: This includes 24 each of pink, blue, green, yellow, and purple. These candy-coated chocolates add not just flavor but a rainbow of colors.
- 2 cups bright white candy melting wafers: Creamy and sweet, these wafers provide the perfect coating that binds your yummy M&M’s together.
Step-by-Step Directions
-
Melt the Chocolate: Take 1 cup of the bright white candy melting wafers and place them in the disposable piping bag. Microwave the bag in 1-minute intervals at 50% power until the candy is completely melted. Make sure to knead the bag gently to ensure the heat is evenly distributed.
-
Prepare the M&M’s: Evenly place one of each color pastel colored M&M into each cavity of the bunny silicone pan. It doesn’t matter if some of them are on their sides; the whimsical look adds to the charm of the final product.
-
Pipe the Candy Coating: Snip off the tip of your piping bag and gently pipe the melted bright white candy melts into each cavity. Aim to just cover the M&M’s without overfilling. After filling, tap the pan gently on the countertop to evenly distribute the candy coating and eliminate any air bubbles.
-
Let It Set: Allow the candy to harden. This should take about 30 minutes at room temperature, or you can speed up the process by placing the pan in the fridge.
-
Remove from Pan: Once the candy bark is completely hardened, carefully remove them from the silicone pan. You should have 24 delightful pieces of Easter Bunny Bark.
-
Repeat and Enjoy: For a larger batch, repeat the process with additional melted candy melts and M&M’s until you achieve your desired quantity.
Tips & Tricks
- If you want an extra layer of flavor, consider adding sprinkles on top before the candy melts harden.
- Make sure the candy melts are completely melted before you start piping to avoid clumps in your finished bark.
- If you’re using multiple colors of candy melts, do make sure to clean the piping bag between colors to maintain a clean presentation.
Serving Suggestions & Pairings
Easter Bunny Bark is a fantastic treat for Easter brunch or as a festive snack on Easter egg hunts. Pair it with a light fruit salad or some icy lemonade for a refreshing balance. It also makes a great centerpiece when placed in a decorative bowl during gatherings or family celebrations.
Nutritional Information
Each piece of Easter Bunny Bark contains approximately 120 calories. While this sweet treat is a delightful indulgence, it’s essential to enjoy it as part of a balanced diet that includes fruits, vegetables, and whole grains to ensure a healthy lifestyle.
Storing Tips & Variations
Store your Easter Bunny Bark in an airtight container at room temperature, where it will last for about a week. If you want to keep it longer, consider refrigerating it or even freezing it for future treats. You can also experiment by using different types of chocolate melts and colorful candies to create a personalized version of the bark!
Conclusion
Easter Bunny Bark is not just a treat; it’s an experience full of fun and creativity that the whole family can enjoy. Whether making it for yourself, family, or friends, this lovely blend of colors and flavors is sure to delight everyone. We encourage you to try your hand at this adorable recipe and share your experience with your loved ones!
FAQs
-
Can I use dark chocolate instead of white candy melts?
Yes, absolutely! Dark or milk chocolate can be used instead for a different flavor profile while still maintaining the festive appeal. -
How can I make this recipe nut-free?
Ensure that all ingredients, especially the M&M’s, are labeled as nut-free and check for any cross-contamination during the process. -
Can I store the Easter Bunny Bark in the freezer?
Yes, you can store the bark in an airtight container in the freezer. Just make sure to separate layers with parchment paper to prevent sticking. -
What other candies can I use instead of M&M’s?
Feel free to experiment with mini chocolate eggs, jelly beans, or even dried fruits for a unique twist on your bark. -
How do I know when the candy melts are properly melted?
They’re ready when fully creamy with no lumps. A gentle squeeze of the piping bag will help indicate if the chocolate is flowy enough for piping.
Easter Bunny Bark
Ingredients
Method
- Melt the Chocolate: Take 1 cup of bright white candy melting wafers and place them in the disposable piping bag. Microwave the bag in 1-minute intervals at 50% power until melted, kneading gently for even heat distribution.
- Prepare the M&M’s: Evenly place one of each color pastel colored M&M into each cavity of the bunny silicone pan.
- Pipe the Candy Coating: Snip off the tip of the piping bag and gently pipe the melted bright white candy melts into each cavity, covering the M&M’s without overfilling. Tap the pan gently on the countertop to distribute the candy coating.
- Let It Set: Allow the candy to harden for about 30 minutes at room temperature or speed up the process by placing the pan in the fridge.
- Remove from Pan: Once completely hardened, carefully remove the pieces from the silicone pan.
- Repeat and Enjoy: For a larger batch, repeat the process with additional melted candy melts and M&M’s.


Leave a Reply