
Fruit Salad Cheesecake is a delightful combination of creamy and fruity flavors that will tickle your taste buds and leave you craving more. This recipe brings together the best of both worlds: a classic cheesecake texture paired with vibrant, juicy fruits that create a refreshing dessert perfect for any occasion. Whether it’s a summer picnic, a family gathering, or just a weekend treat, this dish is family-friendly and incredibly easy to make with step-by-step directions that anyone can follow.
Ingredients
To create this luscious Fruit Salad Cheesecake, you’ll need an array of delightful ingredients that each contribute to its wonderful flavor and texture:
-
1 1/2 cups vanilla wafer crumbs – These crumbly, sweet cookies provide the perfect foundation for the cheesecake, with a subtle vanilla essence that enhances the entire dish. A quick whirl in the food processor transforms them into the ideal crust.
-
2 tablespoons butter, melted – This rich, golden liquid combines with the crumbs, binding them together and adding a soft, melt-in-your-mouth quality to the crust.
-
1 (20 oz.) can crushed pineapple, drained – The juicy, tropical sweetness of the pineapple adds a refreshing note that balances the richness of the cheesecake.
-
3/4 cup granulated sugar – A staple for desserts, this sugar elevates the taste, ensuring the cheesecake is sweet without overpowering the natural fruit flavors.
-
1/2 cup cold water – This is essential for blooming the gelatin, allowing the cheesecake to set perfectly.
-
2 envelopes unflavored gelatin – This ingredient provides structure and stability to your cheesecake, ensuring it holds its shape once set.
-
1 (8 oz.) package cream cheese, cubed – The star of this dessert, cream cheese gives it that creamy, luscious texture that is both indulgent and comforting.
-
1 1/2 cups halved seedless grapes – Their crisp bite and sweetness bring a delightful contrast to the creaminess of the cheesecake.
-
1 (11 oz.) can mandarin oranges, drained and cut in half – These little bursts of citrus brighten the flavor profile and add a touch of acidity that complements the other ingredients.
-
1 (10 oz.) jar maraschino cherries, drained and roughly chopped – Their vibrant color and sweet-tart flavor add a playful element and a pop of color to your cheesecake.
-
1/2 cup finely chopped pecans – These nuts add a crunchy texture and a nutty flavor that rounds out the dish beautifully.
-
2 cups whipped topping (such as Cool Whip) – This fluffy topping lightens the overall texture; it’s essential for achieving that airy quality we love in cheesecakes.
Step-by-Step Directions
Creating your Fruit Salad Cheesecake is a straightforward process that anyone can follow. Here’s how to do it:
-
In a small bowl, combine the vanilla wafer crumbs with the melted butter. Stir until the crumbs are well-coated and can hold their shape when pressed.
-
Press this crumb mixture firmly into the bottom of a 9-inch springform pan that has been lightly coated with nonstick cooking spray. Set aside to allow it to firm up.
-
In a small saucepan over medium heat, cook the drained crushed pineapple along with the granulated sugar for about 5 minutes or until the mixture is heated through and the sugar has dissolved. This step allows the flavors to mingle beautifully.
-
While the pineapple mixture is heating, place cold water in a small bowl and sprinkle the gelatin over it. Let it sit for about a minute to bloom.
-
Stir the bloomed gelatin into the warm pineapple mixture until completely dissolved. This will help your cheesecake set properly.
-
Lower the heat and add the cubed cream cheese to the pineapple mixture. Cook and stir until the cream cheese is fully melted and the mixture becomes smooth and well-blended. Remove from heat and allow it to cool completely.
-
Once cooled, fold in the halved grapes, mandarin oranges, chopped cherries, and chopped pecans into the cream cheese mixture, ensuring it’s evenly distributed.
-
Gently fold in the whipped topping until it’s all combined, creating a luscious, light mixture that is colorful and inviting.
-
Pour this delightful mixture into the prepared pan and smooth the top with a spatula. Cover and refrigerate overnight to allow it to set firm.
-
For a fun twist, you can create mini cheesecakes. Instead of using the crumb mixture, simply place a single vanilla wafer cookie at the bottom of each muffin tin cup (lightly sprayed with nonstick cooking spray) and fill with the fruit salad mixture. Cover and refrigerate overnight.
Tips & Tricks
-
Gelatin Tips: Make sure to fully dissolve the gelatin in the warm mixture to avoid any lumps. If it’s not dissolving, you can gently reheat the mixture, but don’t let it boil!
-
Cool Completely: Ensure the cream cheese mixture is completely cooled before folding in the whipped topping to maintain the light, fluffy texture you desire.
-
Personalize Your Fruits: Feel free to customize the fruit according to what you have on hand or your family’s preferences. Other berries, apples, or citrus fruits work wonderfully too!
Serving Suggestions & Pairings
Your Fruit Salad Cheesecake is perfect for warm weather but can be enjoyed anytime. Here are a few serving suggestions:
-
Garnish: Top your cheesecake with additional whipped cream, fresh mint leaves, or even a drizzle of honey for extra sweetness.
-
Occasions: Serve this cheesecake at birthday parties, family reunions, or barbecue gatherings. It’s always a crowd-pleaser!
-
Pair with Beverages: This dessert pairs beautifully with iced tea, lemonade, or even a light prosecco for the adults.
Nutritional Information
This Fruit Salad Cheesecake serves about 12 portions, with each serving being approximately 250 calories. Here’s a quick rundown of basic nutritional facts:
- Calories: 250 per serving
- Protein: 3g
- Fat: 10g
- Carbohydrates: 38g
- Fiber: 1g
- Sugars: 20g
While tempting to indulge, moderation is key for maintaining a balanced diet. This cheesecake can be part of a healthy lifestyle when enjoyed in reasonable portions.
Storing Tips & Variations
-
Storing: Keep any leftovers covered in the refrigerator for up to 4 days. Ensure it’s sealed tight to maintain freshness.
-
Freezing: If you wish to freeze the cheesecake, slice it and wrap each piece tightly in plastic wrap followed by aluminum foil. It can be frozen for up to 3 months. Thaw in the refrigerator overnight before enjoying.
-
Variations: Experiment with different fruits or even try a flavored gelatin for a different twist. You could also use flavored cream cheese for added depth.
Conclusion
I encourage you to try making this delightful Fruit Salad Cheesecake. With its colorful, fruity layers and velvety creaminess, it’s a treat that both kids and adults will adore. Share your experience and any modifications you make to the recipe. This simple yet impressive dessert is bound to become a cherished favorite in your household!
FAQs
1. Can I use fresh fruit instead of canned?
Yes! Fresh fruit can be used, but make sure to drain any excess moisture to avoid a watery cheesecake.
2. How do I know if my cheesecake has set properly?
The cheesecake should be firm to the touch and hold its shape when cut. If it’s wobbly, it may need more time in the refrigerator.
3. Can I make this cheesecake dairy-free?
You can replace the cream cheese with a dairy-free alternative and use coconut whipped cream for a blissful dairy-free version.
4. What if I don’t have a springform pan?
You can use any dish that’s deep enough to hold the mixture, but be aware that it may be more challenging to slice and serve.
5. How can I make this recipe sugar-free?
Substitute the granulated sugar with your preferred sugar-free sweetener and adjust the quantity to taste for a sugar-free dessert option.
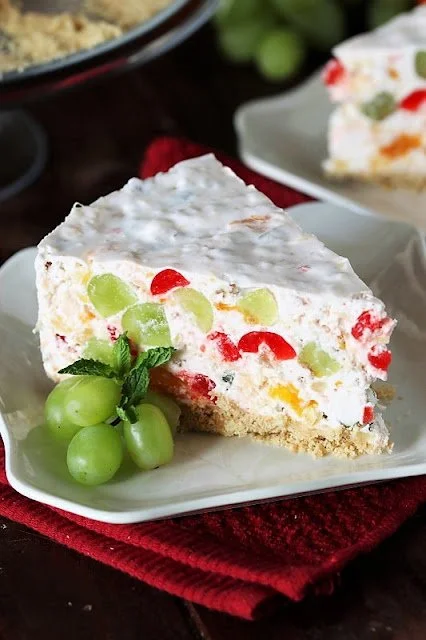
Fruit Salad Cheesecake
Ingredients
Method
- In a small bowl, combine the vanilla wafer crumbs with the melted butter. Stir until well-coated.
- Press the crumb mixture into the bottom of a 9-inch springform pan that has been lightly coated with nonstick cooking spray.
- In a small saucepan over medium heat, cook the drained pineapple with sugar for about 5 minutes until heated through.
- Sprinkle the gelatin over cold water and let it bloom for about 1 minute.
- Stir the bloomed gelatin into the warm pineapple mixture until dissolved.
- Lower the heat and add the cubed cream cheese; cook and stir until melted and smooth.
- Allow the mixture to cool completely.
- Fold in the grapes, mandarin oranges, cherries, and pecans into the cream cheese mixture.
- Gently fold in the whipped topping until combined.
- Pour the mixture into the prepared pan and smooth the top.
- Cover and refrigerate overnight to set.
- For mini cheesecakes, place a single vanilla wafer cookie in each muffin tin cup and fill with the fruit mixture.

Leave a Reply