
Homemade Qeso Fresco (Queso Casero) is a delightful culinary creation that doubles as a comforting reminder of home. This fresh cheese offers a creamy texture and a mild flavor, making it a perfect addition to your favorite dishes or a sensational snack on its own. This simple recipe provides a step-by-step approach to crafting this delicious queso that both chefs and beginners will find accessible. You’ll not only learn the techniques but also enjoy the process, bringing warmth and nostalgia to your kitchen.
Ingredients
To create your Homemade Queso Fresco, you will need the following ingredients:
- 1 gallon whole milk: Using whole milk yields a rich, creamy queso that melts in your mouth.
- 2/3 cup white distilled vinegar or lemon juice: The acidity helps separate the curds from the whey, giving the cheese its distinct texture.
- 4 layers of cheesecloth: This will help strain the curds while allowing moisture to escape.
- Colander: Essential for draining the curds away from the whey.
- Salt to taste: Enhances the flavor of the cheese, so adjust it according to your preference.
- Roasted garlic, minced (optional): Adds a savory depth to your queso.
- Salsa macha (optional): A spicy, nutty sauce that can elevate the flavor profile.
- Fresh or roasted Jalapeño, seeded, minced (optional): For a little kick in your cheese.
- Toasted and crushed chile de arbol, costeño, or puya (optional): A smoky flavor that complements the cheese beautifully.
- Plain option: Feel free to skip the extras and enjoy the queso in its purest form!
Step-by-Step Directions
-
Heat the Milk: In two separate large heavy pots, divide the gallon of whole milk evenly. Heat the milk over medium heat, stirring gently to prevent it from scalding.
-
Check the Temperature: Use an instant-read thermometer to ensure the milk reaches a temperature between 165-180 degrees F. This step is crucial for curd formation.
-
Add Vinegar or Lemon Juice: Once the temperature is reached, gradually stir in 1/3 cup of vinegar or lemon juice into each pot. Use a wooden spoon to gently mix, adding 1 tablespoon of the acid at a time.
-
Curd Formation: Once the curds start separating from the whey, remove the pots from heat and allow them to sit undisturbed for about 30 minutes.
-
Prepare for Draining: Line a colander with four layers of cheesecloth, allowing the edges to hang over the sides. Place the colander in the sink for easy drainage.
-
Drain the Curds: Carefully pour the curds and whey mixture into the lined colander. Let it drain for about 20 minutes, allowing the whey to escape.
-
Extract Moisture: Once drained, gather the cheesecloth edges and twist to remove as much excess moisture as possible from the cheese.
-
Season and Knead: Transfer the cheese into a bowl and salt it to your taste. Knead the cheese for a few minutes to blend in the seasonings.
-
Add Extras (Optional): If you desire to include roasted garlic, jalapeños, or spices, fold them into the cheese mixture now.
-
Chill the Cheese: Press the cheese firmly into the bowl to create a compact layer, then cover it with plastic wrap and chill overnight.
-
Serve: The next day, loosen the cheese edges with a small knife or spatula and gently flip it onto a serving plate. Slice or crumble as preferred. Enjoy with fresh tortillas, salad, or on nachos!
Tips & Tricks
- Use good-quality whole milk for the best results; avoid ultra-pasteurized milk as it affects curd formation.
- For added flavor, try infusing the milk with herbs like thyme or basil during heating.
- If the curds don’t separate well, adding a little more vinegar or lemon juice can help.
Serving Suggestions & Pairings
Homemade Queso Fresco is incredibly versatile! Here are some delightful ways to serve it:
- Tacos and Burritos: Crumble over your favorite fillings for added creaminess and flavor.
- Salads: Add cubes of queso fresco to fresh salads for a savory touch.
- Appetizers: Serve with crusty bread, crackers, or alongside salsas and guacamole.
- Breakfast Dishes: Add it to scrambled eggs or omelets for a delightful morning boost.
Nutritional Information
While specific nutritional values can vary, here’s a general idea for a serving size (approximately 1 oz) of homemade queso fresco:
- Calories: ~80
- Protein: 6g
- Fat: 6g
- Carbohydrates: 1g
Enjoy it in moderation, as it can fit well into a balanced diet when paired with other whole foods.
Storing Tips & Variations
To store your Homemade Queso Fresco:
- Refrigeration: Keep the cheese wrapped tightly in plastic wrap in an airtight container to prevent it from drying out. It should last for about a week.
- Freezing: You can freeze queso fresca for up to 3 months. Thaw in the refrigerator before use.
- Variations: Experiment with various additions such as herbs, spices, or even sun-dried tomatoes for unique flavor profiles.
Conclusion
Now that you’ve learned how to craft your very own Homemade Queso Fresco, it’s time to get in the kitchen! This charming recipe not only nourishes but can become a delightful experience to share with family and friends. Don’t forget to share your experience and variations, as your insights might inspire others to try this delicious homemade cheese.
FAQs
1. Can I use low-fat milk for this recipe?
Using low-fat milk might yield a less creamy texture, but it can still work. However, the flavor won’t be as rich as with whole milk.
2. Can I make queso fresco without cheesecloth?
While cheesecloth is ideal for draining, you could use a clean kitchen towel as a substitute in a pinch.
3. How can I tell when the curds have formed completely?
Look for the curds to clump together and separate distinctly from the whey; they will be soft and slightly gelatinous.
4. What’s the best way to serve leftover queso fresco?
Leftover queso fresco can be used in various dishes such as salads, soups, or even blended into dips.
5. Can I add more spices to customize my queso fresco?
Absolutely! Feel free to explore flavors like cumin or smoked paprika according to your palate.
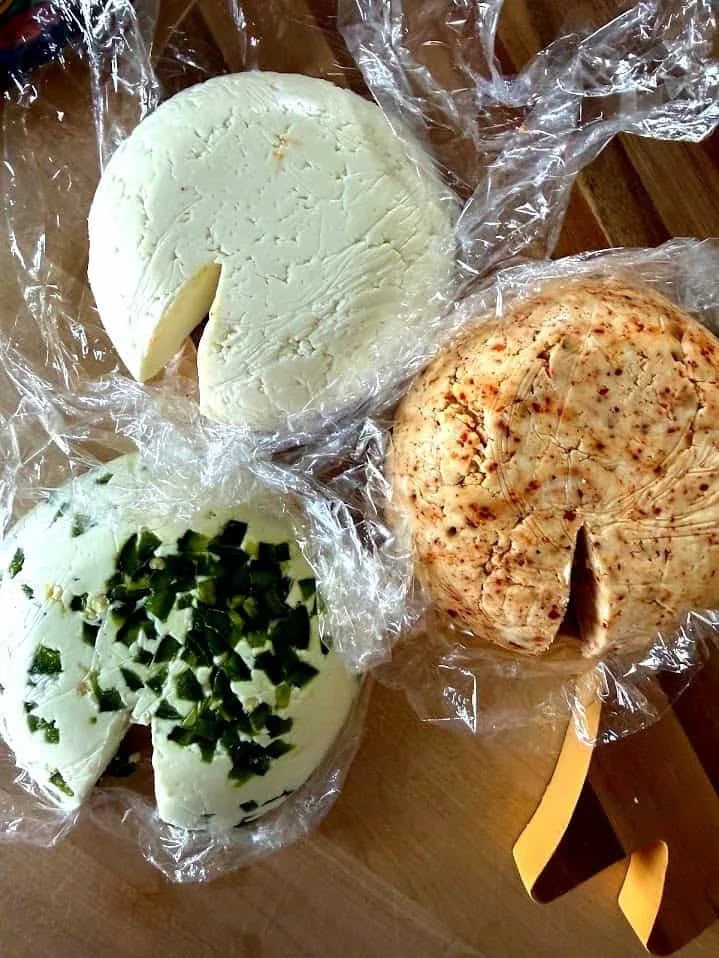
Queso Fresco (Queso Casero)
Ingredients
Method
- In two separate large heavy pots, divide the gallon of whole milk evenly.
- Heat the milk over medium heat, stirring gently to prevent it from scalding.
- Use an instant-read thermometer to check that the milk reaches a temperature between 165-180 degrees F.
- Once the temperature is reached, gradually stir in 1/3 cup of vinegar or lemon juice into each pot.
- Gently mix with a wooden spoon, adding 1 tablespoon of acid at a time.
- Once curds start separating from the whey, remove pots from heat and allow them to sit undisturbed for about 30 minutes.
- Line a colander with four layers of cheesecloth, allowing the edges to hang over the sides.
- Place the colander in the sink for easy drainage.
- Carefully pour the curds and whey mixture into the lined colander and let it drain for about 20 minutes.
- Once drained, gather cheesecloth edges and twist to remove excess moisture from the cheese.
- Transfer the cheese into a bowl and salt to your taste. Knead the cheese for a few minutes to blend in the seasonings.
- If desired, fold in roasted garlic, jalapeños, or spices into the cheese mixture.
- Press cheese firmly into the bowl to create a compact layer, cover with plastic wrap and chill overnight.
- The next day, loosen cheese edges with a small knife or spatula and gently flip onto a serving plate. Slice or crumble as preferred.


Leave a Reply