
Homemade Rock Candy is a delightful treat that brings back memories of childhood fairs, bright colors, and sweet moments shared with friends. This easy-to-make recipe allows you to create beautiful, crystalline candy right in your home. Not only is it visually stunning, but it also provides a satisfying sweetness that will delight both children and adults alike. Rock candy is perfect for celebrating special occasions or simply indulging in nostalgia. Let’s dive into this step-by-step recipe for making rock candy!
Ingredients
- 1 cup of water (240 ml): The clear liquid essential for creating the sugar solution.
- 3 cups of white granulated sugar (600 g): The main ingredient that transforms into sparkling crystals.
- 1 – 2 tsp flavoring: Choose your favorite flavors such as vanilla, peppermint, or fruit extracts to create an aromatic experience.
Step-by-Step Directions
-
Start by dipping the sticks in water and rolling them in sugar. A plate works well to hold the sugar. Focus on covering only the areas where you want the sugar crystals to thrive. This will create "seed crystals" that other crystals will easily adhere to. Set the sticks aside and allow them to dry completely.
-
Next, add a large pot to the stovetop and set it to medium heat. Pour in the water and bring it to a gentle simmer. Gradually add the sugar, one cup at a time, stirring continuously until the sugar completely dissolves. Once you’ve added all the sugar, bring the mixture to a boil. If you’re using a single flavor and color, this is the time to incorporate it into the boiling solution.
-
After reaching a boil, remove the pot from the heat and allow the sugar solution to cool for about 20 minutes. This cooling period is crucial for optimal crystal formation.
-
After 20 minutes, prepare to pour your solution into the containers. Run the tap water until it gets really hot, and use it to heat up your glass or mason jar. Opt for a wide jar (around 800 ml) if you aim for larger candies, or use smaller jars for bite-sized pieces.
-
Pour the hot sugar solution into the containers. If you’re using a metal thermos, there’s no need to heat it. Here’s where you can also add different colors if you want to create a rainbow of rock candy.
-
Attach a clothespin to each sugar stick and set it in the solution. If you’re using a mason jar, you might need a metal ring on top to help secure the clothespin in place. Ensure the stick remains in the center of the jar and is at least 1.5 inches from the bottom to prevent excessive crystallization there.
-
Finally, let the crystals form for 3 to 5 days. During this time, you can use a fork to gently break away any thin sugar layer that forms on the surface. When the candy has crystallized to your liking, pull it out and allow it to dry for about 4 hours. Enjoy your homemade rock candy!
Tips & Tricks
- Experiment with different flavors and colors for a fun variety of rock candy.
- Use a measuring cup for accuracy in sugar measurements to achieve the right consistency.
- Keep the environment still and undisturbed as this promotes better crystal growth.
Serving Suggestions & Pairings
Homemade rock candy makes an impressive centerpiece for parties, special occasions, or as homemade gifts. Pair it with whimsical drinks at children’s parties or serve it alongside dessert tables during holidays. These vibrant crystals can also be used as stirrers for tea or as a decorative addition to cakes and cupcakes.
Nutritional Information
Each piece of rock candy is primarily made of sugar, which means they are calorie-dense but provide no significant nutritional benefits. On average, a single piece contains about 50 calories. Enjoy in moderation as part of a balanced diet.
Storing Tips & Variations
Store your rock candy in an airtight container to keep them fresh and to maintain their crispy texture. For variations, consider trying different sugar types, such as raw sugar or flavored sugars, to add a twist to your candy.
Conclusion
Making homemade rock candy is a delightful craft that brings creativity and sweetness into your kitchen. Whether you’re reminiscing about the past or introducing this classic treat to a new generation, it’s worth the effort. Give the recipe a try and share your experience with friends and family!
FAQs
-
How long does it take to make rock candy?
- The entire process takes about 3 to 5 days for the crystals to form, plus a few hours for drying. The hands-on time is minimal, making it quite simple!
-
What flavors can I use in rock candy?
- You can use almost any flavoring you prefer, including fruit extracts like strawberry or raspberry, classic vanilla, or even mint for a refreshing taste.
-
Can I use food coloring in rock candy?
- Yes, adding food coloring is a fun way to customize your rock candy! Just be sure to add it when the sugar solution is hot.
-
Why is my rock candy not forming?
- If the environment is too humid or if the solution didn’t cool properly, it might affect crystallization. Make sure to follow the steps carefully.
-
Is rock candy safe for kids?
- Homemade rock candy is safe for kids, but the high sugar content means it should be enjoyed in moderation. Always supervise young children to prevent choking hazards.
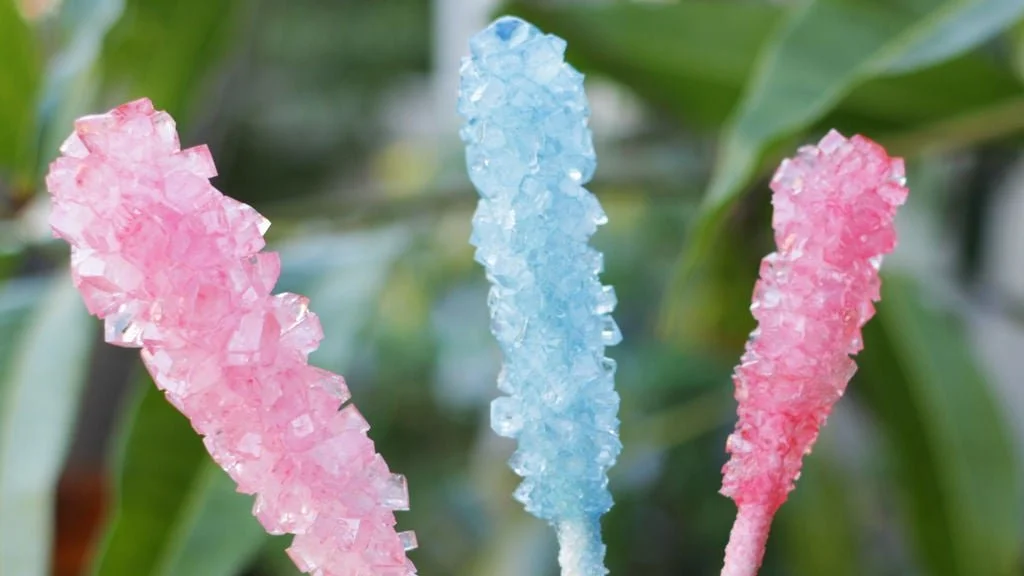
Rock Candy
Ingredients
Method
- Dip the sticks in water and roll them in sugar to create seed crystals. Set aside to dry.
- Add a large pot to the stovetop on medium heat. Pour in the water and bring to a gentle simmer.
- Gradually add the sugar, one cup at a time, stirring until completely dissolved.
- Once all sugar is added, bring the mixture to a boil. Incorporate any flavoring if using.
- Remove from heat and allow to cool for about 20 minutes.
- Heat up your glass or mason jar with hot tap water. Pour in the hot sugar solution.
- Attach a clothespin to each sugar stick and place it in the solution, ensuring it’s centered and away from the bottom.
- Let the crystals form for 3 to 5 days, gently breaking away any thin sugar layer that forms.
- Once crystallized to your liking, remove from the solution and allow to dry for about 4 hours.



Leave a Reply